

Last Updated on 7 months by Christopher G Mendla
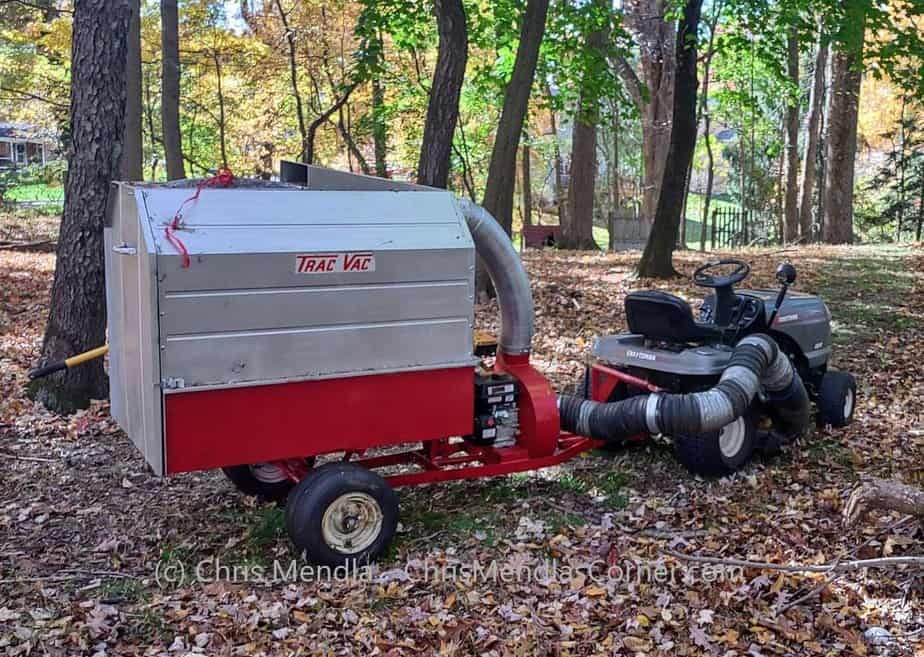
When I purchased my home in 1999, a Trac Vac 580 was part of the sale. I have about an acre of hardwoods and an acre or so of grass. I used it for a while and then let it sit after blowing a head gasket. This year (2022) I restored and repowered it.
I am in the process of fully developing this article as of late Nov 2022. Please stop by for additional updates.
Trac Vacs background
I have a good number of trees on my property including Norway Maples and Oaks. Every fall I have an epic battle with falling leaves. Hiring a service to clean up is prohibitively expensive. When I first bought the house, I used the Trac Vac. The Trac Vac was already a decade or so old at that point. After a few years I blew a head gasket. I had other issues on my priority list so I simply put the Trac Vac on the side and covered it with a tarp. It sat there for at least a decade untouched.
In the intervening years, I used mulching blades and a mulching plate on my Sears Craftsman LT-1000 tractor. That worked to an extent but it required repeated passes as the leaves got deeper. The end result was OK but it wouldn’t put in in contention for being on the corner of a home and garden magazine
This summer, I decided to take a good look at the Trac Vac and either restore it to running condition or scrap it. A new Trac Vac or similar machine would run upward of $3000 new. I looked on Craigslist and saw that the used vacs weren’t in much better condition than my unit.
Damage Assessment.
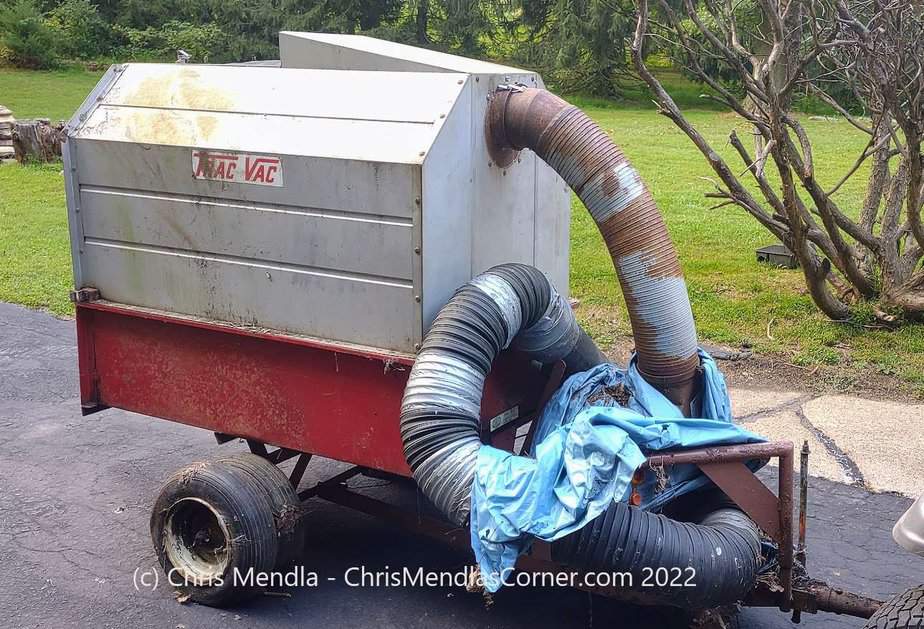
The vac was on the side of the garage under some evergreen trees. The previous owner had fitted a dual axle frame. Both tires on the left side were flat, as in unfixably flat. There was rust on the frame, body and discharge tube.
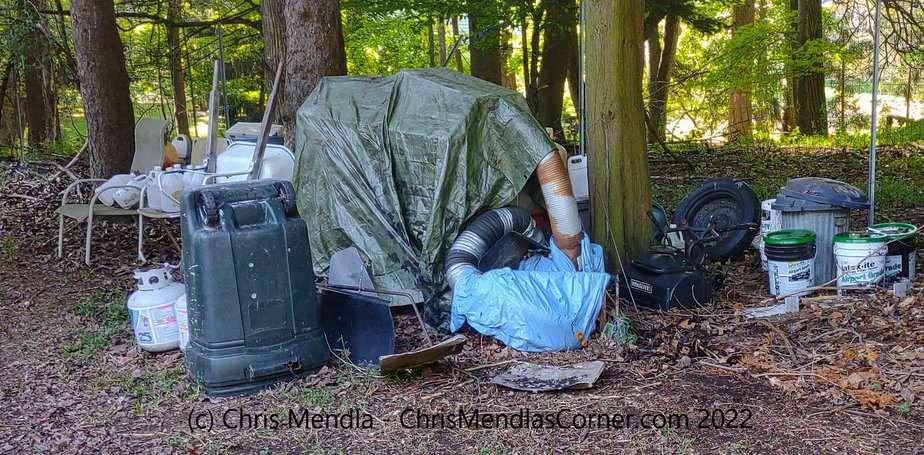
I hooked up the tractor and pulled it out to the driveway to evaluate it.
Initial Evaluation
The initial evaluation was that I would probably be able to restore the vac.
Engine
The engine was a Briggs and Stratton 206cc. I was pretty certain that the head gasket was blown because of the smoke screen it generated when I last used it. The carburetor was covered in oil and crud. The gas tank looked a bit sketchy. I had to make a choice of trying to rebuild it or replace it. Given the difficulties I had removing the impeller that I will describe later, replacement was the better choice.
Frame
The frame was in pretty good shape with some surface rust which did not affect the structural integrity. When I pulled the wheels, the axles appeared to be in good shape
Wheels
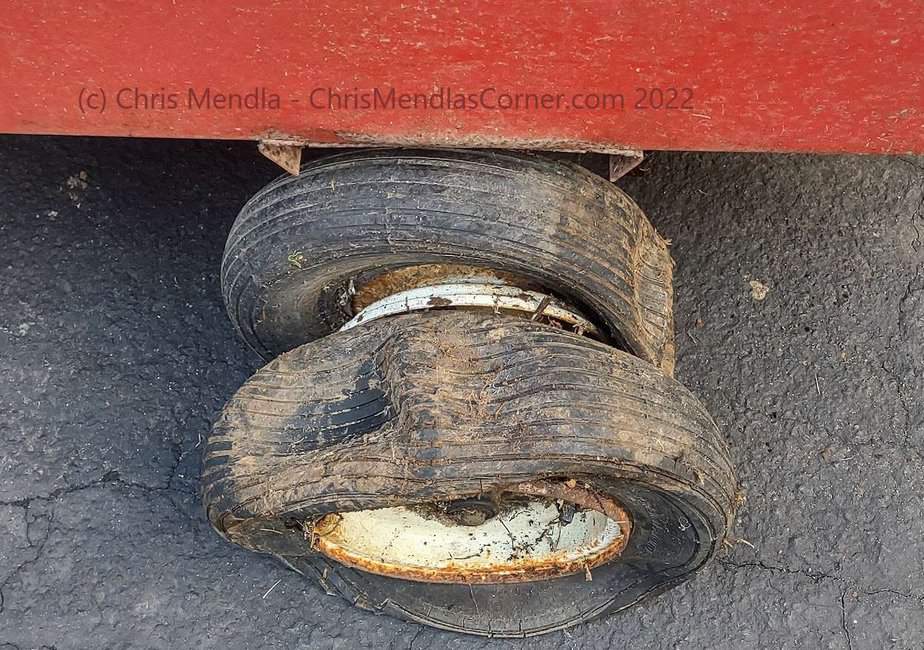
The wheels on the left side were completely flat. Water had cause severe rust on the inside of the rims. The tires themselves were dry rotted. I decided to order 4 tires and tubes and attempt to restore the rims.
The wheels and tires on the right side were a little low on air but upon refilling them, they held air perfectly. I decided to keep them as is
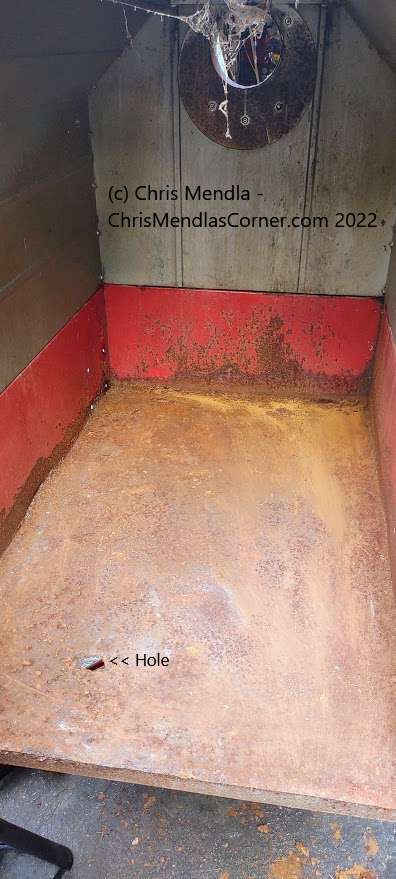
Body
The body had significant rust, especially the bed. There were two holes. One was the size of a quarter and the other about 3″ x 4″. The weld at the front where the bottom meets the front side had separated a bit.
The cover was in good shape. I noted that it was steel with aluminum paint.
Accessories
The arm that holds the intake hose was frozen. I figured I could get that freed up.
The jack stand was frozen as well.
The fasteners for the rear gate were in surprisingly good shape. These are made of regular steel and had been sitting out in the weather for a decade.
The tongue is supposed to rotate to account for uneven surfaces. There is enough play in the hitch that I figured I could deal with that down the road.
Summary
After evaluating the current situation, I figured that I could restore the vac. I decided to repower instead of rebuild the old engine. The Predator sold by Harbor Freight seemed as though it should work. Purchasing that would be a gamble but, given the cost of a new vac, seemed to be a good bet.
I checked and surprisingly Trac Vac still sells replacement units. I know that this vac is at least 25 years old. Perhaps it is even older. Providing critical parts for something manufactured a quarter of a century ago is pretty amazing in my view.
I didn’t expect that I would run into anything that would make the project impossible. New turbine/engine assemblies can be purchased although that would add greatly to the expense.
I decided to go ahead and try to restore the vac.
The restoration
The restoration involved a couple of weekends of work along with evenings after work. I honestly don’t know how many hours i put into it buy 40 hours might be a good guess. While it was a lot of work it was a challenge that I found enjoyable and informative.
Disassembly
This would involve removing the trailer cover, hoses, engine, bad wheels and more.
Wheels
I decided to start with the two bad wheels. I have a couple of floor jacks and jack stands. The wheels are held on with cotter pins Both wheels came off easily. The next step was to clean them up and mount new tires and tubes. That was a little more involved than I expected. The one rim was badly rusted. (Details coming)
Rust removal and treatment
I have a low end pressure washer. That did a fair job of removing the bulk of the rust, accumulated dirt and mildew. After pressure washing, I used a couple of different wire wheels to remove the balance of the rust using a black and decker cordless drill. Eye protection is a good idea with wire wheels. I used some gel rust remove for the stubborn spots. After using the wire wheels and rust remover, I power washed it again. This included the frame, bed and cover.
The engine and blower were still in their original position.
I already had a couple of cans of Rustoleum Rust Reformer. This was essential to the project. I ordered another six cans from Amazon and ended up using all 10 cans worth. I’ve had good results with Rust Reformer so far. I didn’t put a finish coat on the inside of the trailer or trailer cover.
Finish coats
I used Rust-Oleum Sunset Red gloss for the body and Turbine. The turbine housing was originally a gold color along with the engine but I don’t plan on entering any Trac Vac shows so I painted it all red. I used about two cans of Rust-Oleum 7515838 Professional High Performance Enamel Spray Paint, 15 Ounce for the trailer cover and discharge hose.
Trailer bed repair
As mentioned previously, the trailer had two holes plus a pinhole. I didn’t own a welder although I have one now. I decided to use bondo and galvanized plate. My thought was that the bondo would prevent moisture from causing rust between the plate and bed. I’ll know in a year or so if I was correct.
I tried sealing the seam at the front with alumaweld. Unfortunately that didn’t work. I ended up sealing it with Dura Steel epoxy. That seems to be holding OK. It probably should have been welded but, again, I didn’t have a welder.
Turbine removal
This was the most difficult part of the whole project. The nuts for the turbine housing came off easily. They probably were in place for 25 years or more. In spite of that, they came right off.
The turbine has a set screw. Many people have trouble getting that loose. Fortunately i was able to remove it using a combination of a breaker bar, socket and hex head bit.
The next step was to pull the turbine. That turned into a nightmare. The turbine was stuck on the shaft. I tried heat, banging, 4 different pullers and a stream of bad language. It just didn’t want to come loose.
I tried attacking it by breaking the engine casing and trying to remove it that way. That was another dead end.
I should have taken it to a local small engine shop but I had no idea how stubborn it would be. Generous applications of penetrating oil, mapp gas and freezing penetrating oil had little effect. I tried everything short of 2 pounds of black powder. I purchased a higher end puller from Harbor freight and that didn’t work. The problem is that the slots for the puller are a bit shallow.
I got a little obsessive about removing it. I tried drilling out the woodruff key. That didn’t help. Then I tried drilling around the hub.. Nope. I think they made that out of depleted uranium.
Then I thought I’d try drilling a series of holes across the disk and breaking it in half. Good try but the impeller has a substantial central hub.
I was finally able to break it loose by prying with a crowbar and prybar between the back of the disk and the turbine housing. The turbine housing is decently thick but I didn’t want to hit it with a lot of force. I was trying to ‘wiggle’ it off. All the while I was dousing it with penetrating oil.
Finally, the stinking beast broke loose. I think most of my neighbors heard me yelling in celebration. (Details and pictures coming soon)
When you do get it apart take note of exactly which holes were used to bolt the housing to the engine.
At this point, the engine was beyond useless due to my attack on the housing an the mangled shaft.
Details and more photos of removing the impeller
Mounting the engine
The engine mounting holes lined up perfectly. I bolted the engine down and attached the turbine housing. Before re-using the nuts and bolts, I cleaned them up. Ideally, it would be a good idea to use new nuts and bolts.
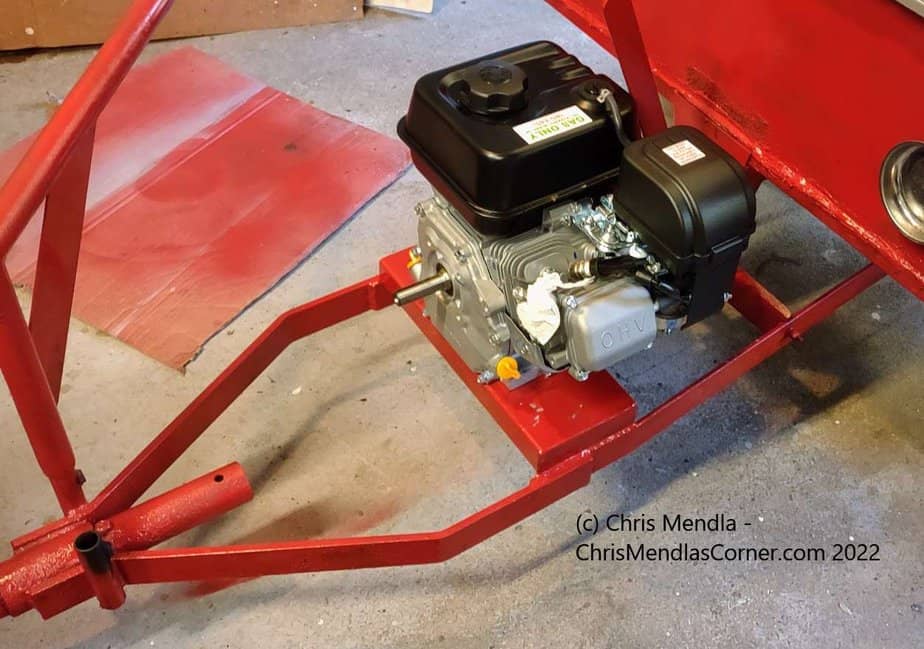
Mounting the impeller.
This got me worried for a bit. Harbor Freight provides a Woodruff key with the engine. Trac Vac also provides a key. I tried using the key from the engine and it was ever so slightly too large. After some frustration, I tried the key that came with the impeller and that worked perfectly.
Freeing the hose arm
The hose arm is supposed to swivel to accommodate the hose when you turn. It had frozen up. I drilled a small hole in the top so I could squirt penetrating oil in using the straw. After a couple of applications of penetrating oil and some serious whacking with a hand held sledge hammer, it broke free. PRO TIP – Just imagine the arm is someone you don’t like 🙂
The jack stand
The trailer has a pipe stand held in place with a lock screw. A combination of penetrating oil and heat finally freed that up. Unfortunately the bakelite handle for the screw broke. A bit of expoxy fixed that. I chase the thread on the bolt and captive nut with a tap and die.
Trailer gate retention pins
There are two pins at the top of the gate to secure it in case the clips fail. I’m not sure if they are original or not. One pin was missing. I used a clevis pin to replace it which works fairly well.
In addition, I put two high quality magnets on the top of the trailer cover. When I go to dump the leaves, I simply stick the hitch pins to the magnets.
Dump lever
The safety pin for the dump lever was frozen to the lever. Some brute force along with heat and penetrating oil allowed it to be removed.
Exhaust.
A major problem that I ran into was that the configuration of the exhaust port in relation to the turbine housing made it impossible to mount the original muffler. I tried configuring an exhaust pipe with a combination of copper tubing and exhaust repair epoxy. That lasted a whole two minutes, maybe less.
The exhaust is about .9 inches in diameter. The pipes are not perfectly round. I found an aftermarket pipe. I used that pipe, in combination with flanges to reconfigure the exhaust to clear the turbine.
In order to do that, I purchased Harbor Freight’s low end stick welder. I watched a number of videos. Before attempting to weld the exhaust, I made sure that my will was up to date. I was able to weld the flanges on. If someone were to grade my welds it would probably rate ” A drunken monkey on a flatbed truck bouncing over a rock bed at 40 mph could have done a better job”. But, it was my first attempt and I was working on a round surface, not flat. It is holding up fine so far (Details and pics to come shortly)
The solution I came up with does raise the hot muffler a bit so I need to be careful. I painted the top with hi temp orange paint to remind me to stay clear of it.
Hose Hanger
An eye bolt on the right side of the trailer top allows me to hang the intake hose when it isn’t attached to the trailer.
Oil Fills – Danger Will Robinson
I removed the oil fill on the right side of the engine. I thought that would be easier to access than the oil fill on the left. NOPE NOPE NOPE. The clearance between the engine and turbine housing is nil, or even negative. I removed it with difficulty but could not re insert it. I was NOT about to dissassemble things. So I put a sandpaper wheel on my dremel and shaved it down until I could reinstall it. It will remain in place for the life of the engine. I’ll use the other fill plug for oil.
Leaf chute repair
The chute that attaches to the mower deck had a crack. A bit of fiberglass and resin fixed that. I also added a ring to the side of my tractor to use a bungee to hold the hose in a better position. That all seems to be working fine.
Start up and Break in.
The engine started on one pull. Suction was working as expected. The owner’s manual calls for three hours of break in before putting a load on the engine. I ran if for the three hours varying the speed a little. The exhaust worked perfectly. The instructions call for an oil change at 10 hours. I installed an engine hour meter.
Results so far.
The vac is working great. I’m kicking myself in the keister for not doing this sooner. There is a bit of a rattle from the engine/turbine. I don’t’ believe that is a problem. The turbine is pretty much up against the engine so I suspect that is an issue. I have over six hours of leaf sucking time on the rig so far. I’m due for an oil change after this weekend.
Between the vac and tractor the noise level is pretty high. I use earplugs.
Running the tractor and vac at full speed does eat up gas. I really miss the days of 1.83/gallon gas. So far, I’ve gone through about 8 gallons.
Workflow
Details on my workflow for leaf cleanup are coming soon. I’ve learned the time it takes to fill the bin, the best speeds for vacuuming and some other tips.
Costs
The direct costs were about 600 dollars or so
- $150 – Harbor Freight Predator Engine
- $249 – Replacement turbine from Trac Vac
- $60 for 6 cans – 10 cans of Rust-Oleum Rust Reformer
- 4 cans of Rust-Oleum Sunset red gloss paint
- $22 – 2 cans of Rust-Oleum Metallic Aluminum Paint
- $63 – 4 tires and tubes (2 each used)
- $23 each – 2 Exhaust pipes – One for the project and one for a cold spare. The size is unusual so I purchased it n case it would be difficult to find later
- $12 – 2 exhaust flanges. I cut and re-configured the flanges from the muffler and exhaust pipe. That was a lot of work. The flanges will speed things up if I ever have to rebuild the exhaust extension.
- $18 – Replacement Muffler (I scrapped one with my first exhaust mod attempt)
- 3 cans of penetrating oil
- Degreaser.
- Galvanized steel plate for hole repair
- Bondo
- Dura Steel epoxy
- $10 – Engine hour meter
The indirect costs were
- Harbor freight mini tire changer
- Harbor freight pro puller set
- Harbor freight mini puller set
- A couple of smaller wheel pullers
- Harbor Freight stick welder, helmet, gloves, welding rods
- One bottle of MAPP gas.
Tools used
- A good socket set
- Air Impact wrench
- Wire wheels
- Bench grinder
- Wheel Pullers
- Tap and die set
- Hammers, Metric and english
- Stick Welder
- Floor Jack
- Jack Stands
- Crowbars and pry bars
- Mini Tire Changer
Summary
The Trac Vac makes cleaning leaves a lot more efficient and creates a much neater end result. I did one pass through the woods early on. Now, I’m only using the mulching blades and plate. Leaving the leaf mulch in the woods will leave nutrients for the trees.
I already had the Trac Vac. A similar new unit is about $2500 or so. You could probably find a used unit on craigslist or ebay. If you purchase a new unit you will have a warranty. If you restore an old unit, you are taking some risk of failure.
I found it to be an enjoyable challenge. I saved money by restoring my old derelict unit. The stubborn impeller added a lot of time. Out of pocket costs for direct materials amounted to about $600. Purchasing some tools such as pullers and a welder added another $400 or so. However, I will use those tools in the future.
There are other brands of leaf vacs. Repowering them and other Trac Vac models will depend on the way that the replacement engine fits.
Restoring and repowering a Trac Vac 580
- Restoring and repowering a Trac Vac 580 main page
- Removing the impeller
- Reconfiguring the exhaust system
- Tips Tricks and Hacks for using a leaf vac
